Network Setup and NAT Configuration on Palo Alto Firewall
- Feb 13, 2025
- 2 min read
Network Setup

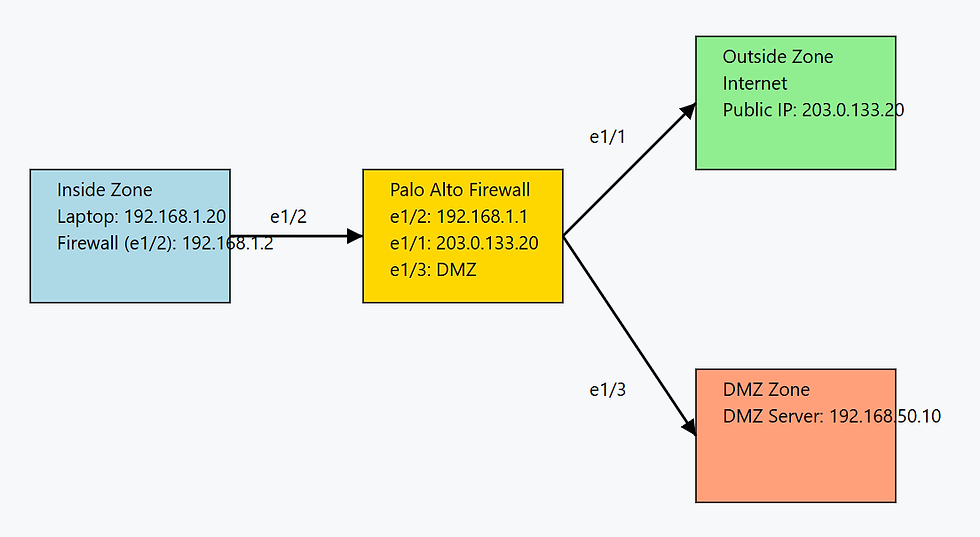
You have a network setup as follows:
Internal Laptop (Inside Zone): 192.168.1.20 (Interface e1/2, IP: 192.168.1.2)
Outside Zone (Internet): e1/1, IP: 203.0.133.20
DMZ Server: 192.168.50.10 (DMZ Zone)
Firewall Interfaces:
Inside: e1/2 - 192.168.1.2
Outside: e1/1 - 203.0.133.20
DMZ: e1/3
Objective
Configure Source NAT to allow the internal PC (192.168.1.20) to access the Internet using the firewall's external IP (203.0.133.20).
Configure Destination NAT to allow internal users to access the DMZ Server (192.168.50.10) using 192.168.1.1.
Step 1: Configure Source NAT (Internal PC to Internet)
This allows the internal PC (192.168.1.20) to browse the Internet by translating its private IP to the firewall’s external IP.
1.1 Create a Source NAT Rule
Navigate to: Policies → NAT → Add New Rule
Name: SourceNAT_Inside_to_Internet
Original Packet:
Source Zone: Inside
Destination Zone: Outside
Source Address: 192.168.1.20
Destination Address: Any
Translated Packet:
Translation Type: Dynamic IP and Port (PAT)
Interface: e1/1
Translated Address: 203.0.133.20 (Firewall’s External IP)
Click OK and Commit.
1.2 Create a Security Policy to Allow Internet Access
Navigate to: Policies → Security → Add New Rule
Name: Allow_Inside_to_Internet
Source:
Source Zone: Inside
Source Address: 192.168.1.20
Destination:
Destination Zone: Outside
Destination Address: Any
Application: Any
Service/URL Category: Any
Action: Allow
Click OK and Commit.
Step 2: Configure Destination NAT (Internal to DMZ Server)
This allows users in the Inside Zone to access the DMZ Server (192.168.50.10) using the NAT address 192.168.1.1.
2.1 Create a Destination NAT Rule
Navigate to: Policies → NAT → Add New Rule
Name: DNAT_Internal_to_DMZ
Original Packet:
Source Zone: Inside
Destination Zone: Inside
Source Address: Any
Destination Address: 192.168.1.1
Translated Packet:
Translation Type: Static NAT
Translated Address: 192.168.50.10 (DMZ Server IP)
Click OK and Commit.
2.2 Create a Security Policy to Allow Access
Navigate to: Policies → Security → Add New Rule
Name: Allow_Inside_to_DMZ
Source:
Source Zone: Inside
Source Address: Any
Destination:
Destination Zone: DMZ
Destination Address: 192.168.50.10
Application: Any (or specify service, e.g., HTTP/HTTPS if it's a web server)
Service/URL Category: Any
Action: Allow
Click OK and Commit.
Verification Steps
Verify Source NAT
From the internal PC (192.168.1.20), open a browser and try accessing an external website (e.g., www.google.com).
On the Palo Alto firewall, go to Monitor → Logs → Traffic and check if the Source NAT is applied (192.168.1.20 should be translated to 203.0.133.20).
Verify Destination NAT
From the internal network, open a terminal and ping 192.168.1.1.
Try accessing the DMZ server (e.g., via SSH or HTTP, depending on the service running).


Comments